RGB Shift Hover Effect with WebGL
A short walk-through of how to achieve hover effect with WebGL. I will use Three.js.
HTML markup:
Let’s start simple, create HTML markups like so:
<div class="container">
  <div class="gallery__wrapper">
    <div class="item" data-author="Mak">
      <img
        src="https://images.unsplash.com/photo-1590671646317-29ee9058e244?ixlib=rb-1.2.1&ixid=eyJhcHBfaWQiOjEyMDd9&auto=format&fit=crop&w=600&q=80"
      />
    </div>
  </div>
</div>
With some styling, it should be looking something like this:
Adding a “Hello World” Three.js canvas:
(this is copied from getting started Three.js’s docs)
var scene = new THREE.Scene()
var camera = new THREE.PerspectiveCamera(
75,
window.innerWidth / window.innerHeight,
0.1,
1000
)
var renderer = new THREE.WebGLRenderer()
renderer.setSize(window.innerWidth, window.innerHeight)
document.body.appendChild(renderer.domElement)
var geometry = new THREE.BoxGeometry()
var material = new THREE.MeshBasicMaterial({ color: 0x00ff00 })
var cube = new THREE.Mesh(geometry, material)
scene.add(cube)
camera.position.z = 5
var animate = function () {
requestAnimationFrame(animate)
cube.rotation.x += 0.01
cube.rotation.y += 0.01
renderer.render(scene, camera)
}
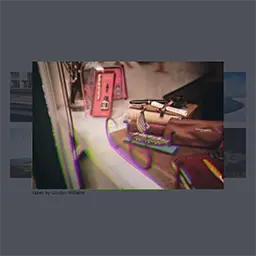
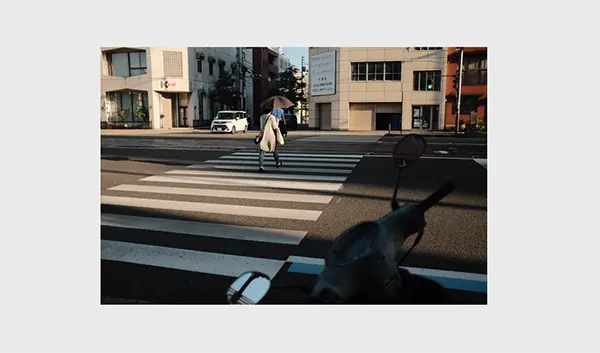
animate()Loading texture from ![]()
We need to load the texture of the image we use in <img> into a Plane on canvas.
// loading texture
let textureLoader = new THREE.TextureLoader()
let texture = textureLoader.load(image.getAttribute('src'))

// creating plane
let geometry = new THREE.PlaneBufferGeometry(6, 4, 32, 32)
let material = new THREE.MeshBasicMaterial({ map: this.textures[0] })
let plane = new THREE.Mesh(geometry, material)

// adding plane into scene
scene.add(plane)
Switch to EffectComposer for rendering
To achieve the hover effect, we need to apply post-processing effect on our renderer, and amplify the effect based on mouse position. But first we need to switch the renderer to EffectComposer instead because all post-processing effects need to be render through Effect Composer:
import { EffectComposer } from 'three/examples/jsm/postprocessing/EffectComposer'
import { RenderPass } from 'three/examples/jsm/postprocessing/RenderPass'
import { ShaderPass } from 'three/examples/jsm/postprocessing/ShaderPass'

// creating effect composer
let composer = new EffectComposer(renderer)
composer.addPass(new RenderPass(scene, camera))
Remember to replace render(), we no longer render from our original renderer, instead we use the newly created Effect Composer instance:
// instead of this:
renderer.render(this.scene, this.camera)

// we render from Effect Composer instead:
composer.render()
Apply custom effect
Now into the main custom effect. In order to apply post-processing effect, we would need a custom ShaderPass and put it into another layer of pass through EffectComposer. Our custom effect displace the Red Channel & Blue Channel then merge with the original texture:
let uniforms = {
  uAmount: {
    value: 0.008, // strength of effect
  },
  uMouse: {
    value: new THREE.Vector2(0.5, 0.5), // position of mouse
  },
}
let vertexShader = `
    varying vec2 vUv;

    void main() {
      vUv = uv;
      gl_Position = projectionMatrix * modelViewMatrix * vec4( position , 1.0 );
    }
  `
let fragmentShader = `
    uniform sampler2D tDiffuse;
    uniform float uAmount;
    uniform vec2 uMouse;

    varying vec2 vUv;

    float circle(vec2 uv, vec2 disc_center, float disc_radius, float border_size) {
      float dist = distance(uv, disc_center);
      return smoothstep(disc_radius+border_size, disc_radius-border_size, dist);
    }

    void main() {
      float c = uAmount * circle(vUv, uMouse, 0., 0.2); // displacing vertices

      vec4 cr = texture2D(tDiffuse, (vUv + c)); // extract Red channel
      vec4 cga = texture2D(tDiffuse, vUv);
      vec4 cb = texture2D(tDiffuse, (vUv - c)); // extract Blue channel

      gl_FragColor = vec4(cga.r, cr.g, cb.b, cga.a); // merge together
    }
  `
let effectPass = new ShaderPass({
  uniforms: this.uniforms,
  vertexShader: vertexShader,
  fragmentShader: fragmentShader,
})
effectPass.renderToScreen = true

// add to EffectComposer
composer.addPass(this.effectPass)
Now we start tracking mouse position and pass it into ShaderPass: uniforms
document.addEventListener(\"mousemove\", (e) => {
  mousePosition.x = e.clientX;
  mousePosition.y = e.clientY;
});
Then in animation loop, we calculate the speed of the mouse movement and update ShaderPass uniforms.
// calculating speeds
mouseSpeed.x = (this.mousePosition.x - this.effectPosition.x) * 0.08
mouseSpeed.y = (this.mousePosition.y - this.effectPosition.y) * 0.08

// passing updated effect position into shader
effectPass.uniforms.uMouse.value.x = effectPosition.x / window.innerWidth
effectPass.uniforms.uMouse.value.y = effectPosition.y / window.innerHeight

// update effect position based on speed
effectPosition.x += mouseSpeed.x
effectPosition.y += mouseSpeed.y
We multiply 0.08 with mouse position to get a smooth delay effect of mouse movement.